How to Reheat a Burger with Bun in air fryer
Focus on air frying a pre-cooked burger patty then all other components will come together with ease, with the bun only needing a minute to warm through.
Reheating a burger in a bun must be done separately; by first air frying the burger patty at 200°C/400°F for 6 minutes in total. Final two minutes of air frying time will allow plenty of time to reheat bacon and additional burger components, while the burger bun will only need to be reheated for a minute.
STEPS TO RE-HEATING BURGER IN A BUN:
What you are about to learn is to quickly reheat any kind of pre-cooked burger you might of had, but was too full at the time, to reheat back to its full glory.
Reheating a burger patty must allow plenty of time to heat the centre, without drying the beef out; at the same time allowing the grease - which is flavour by the way - to re-activate to provide a juicy burger again.
Burger patty and all its components must be air fried uncovered, as a wrapped in foil burger will only slow the air frying process, and thus preventing burger getting crispy.
I am air frying a day before BBQ burger which consisted of a 5 inch wide, one-half inch thick smashed burger, which I am sure will reheat similar to any burger reheated from being cooked in the oven, on the grill or under the broil/grill and in my case a barbecue which was almost 24 hours prior.
In addition, the burger you intend to reheat at home doesn't have to be made or cooked at home prior, when these air frying instructions could be used to reheat a Big Mac or a Burger King Whopper, where you must follow these instructions exactly.
Next time you can think about making a burger in an air fryer fresh, with ground/mince beef formed into a burger; but not before cooking additional ingredients prior to air frying a raw beef patty which will only take 10 minutes.
Never reheat a burger with a bun (plus additional ingredients) without disassembling it all first, because its easier to reheat smaller food items than one massive chunky burger.
Before you begin to air fry available burger components, ensure all ingredients have sat at room temperature for a minimum of 30 minutes.
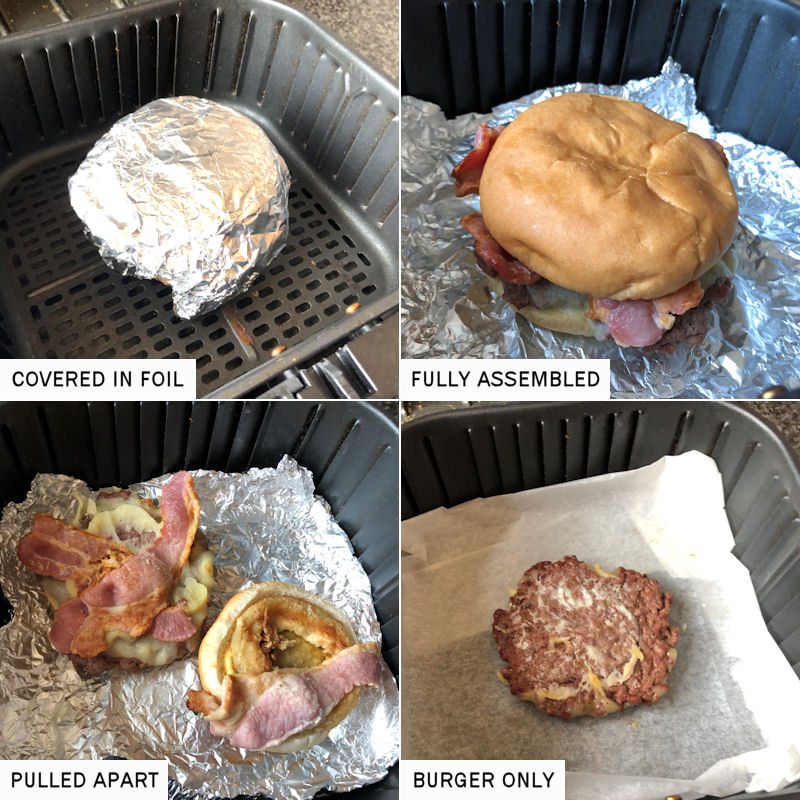
STAGE 1: Fully disassemble Burger
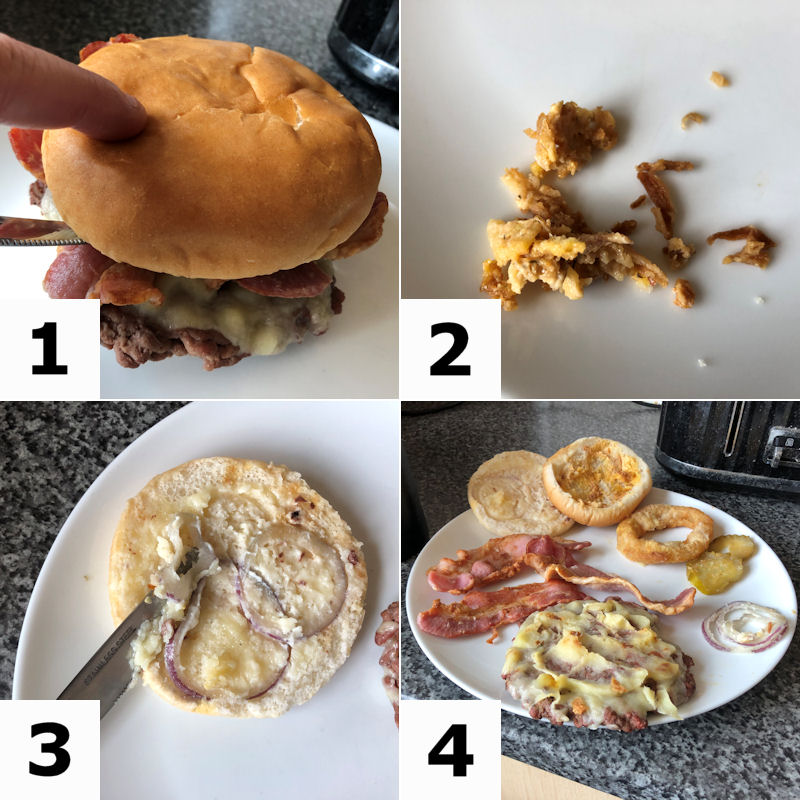
What you may have realised your particular full burger in a bun can be a much as 4 inches tall, of which we're never going to successfully air fry a hefty burger like this, unless we fully disassemble it, and then air fry all components separately.
- STEP 1: Use a knife to pry-open stuck together ingredients - Often opening a burger in a bun that has sat cold or been refrigerated overnight will stick together due to the beef grease and cheese; thus its vitally important to diligently open every layer with a sharp knife - being careful not to tear the bun especially
- STEP 2: Dispose of unuseable cold ingredients - Additional cold items added to your burger originally must all be removed, then disposed off or added again once the burger has been re-assembled. Additional items can include dried onion bits, gherkins, tomato slices and Iceberg lettuce
- STEP 3: Scrape off sauce on burger buns - Along with the cold ingredients saved or disposed of in the trash, let's not forget to scrape off your favourite sauces added to the burger - like ketchup, mayonnaise, burger sauce and barbecue sauce. Don't worry about any remaining sauce left on the bun, it will be perfectly OK to air fry.
- STEP 4: Position to air fry ingredients on a plate - What ingredients were added to the burger fresh off the grill, BBQ or oven, must now be ready for the air fryer. Get the burger patty ready of course, plus extras like bacon and onion rings - with an option to add a fresh slice of burger cheese to melt
Cheese which was originally added to the burger is likely to now be fused onto the beef patty, thus we are unlikely to successfully remove it. We can instead leave it as it is to reheat with the patty - then apply a new cheese slice on top if you have any spare.
STAGE 2: Reheat Burger patty only at 200°C/400°F, 6 minutes
Regardless of how heavy or what size your burger patty is, we can set the temperate on the air fryer to a reliable 200°C/400°F - with the intention of air frying the burger patty for 4 minutes initially - before we continue to add the other ingredients for the final 2 minutes; bringing the total air frying time to 6 minutes.
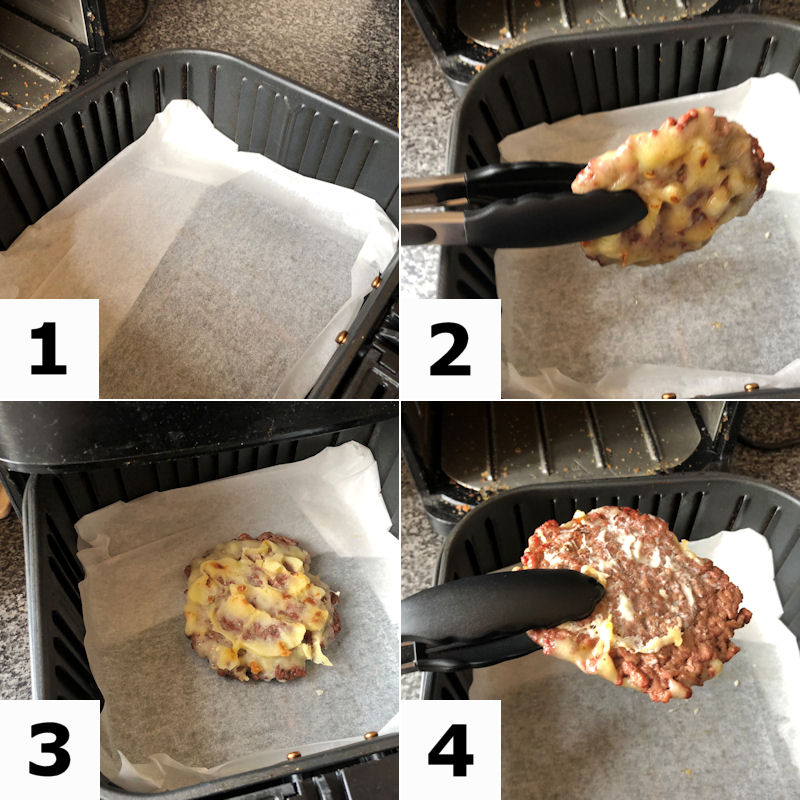
So we're on the same page, let's not pre-heat the air fryer this time, because we are lining the basket/crisper with parchment paper or foil, thus it will be too hot to handle.
- STEP 1: Line basket with parchment paper/foil with lip - Prepare the inside of your air fryer basket or crisper by lining a cut-to-size sheet of parchment paper (which I am using) or foil. Ensure there's a lip on all four sides - or produce a lip as seen on a dinner plate if its a rounded air fryer - to be sure grease cannot spill over
- STEP 2: Add burger patty to basket/crisper - We're naturally giving the burger patty a head start on the cooking time, thus to allow additional ingredients less time but to bring all ingredients together at the end. Pick a spot within your air fryer knowing you will soon be adding bacon for example, so there must be room
- STEP 3: Cook for 2 minutes, cheese-side up - go straight in and begin to air fry your burger patty only at 200°C/400°F for two minutes. When two minutes are up, flip the burger patty over to air fry the opposite side - you must flip your burger a minimum of 2 times, with an option to flip four times
- STEP 4: Cook for 2 minutes, cheese-down - when the first two minutes are up, flip the burger again and proceed to air fry patty for 2 minutes more - we will be air frying the patty for another 2 minutes, so don't remove it just yet
STAGE 3: Reheat extras at 4 minute mark, reheat for 2 minutes
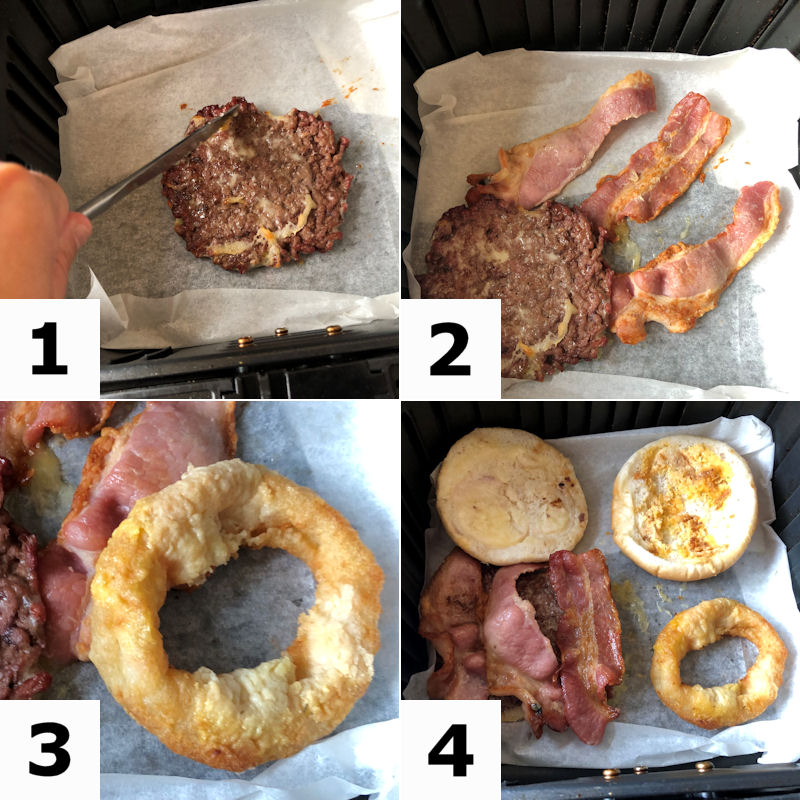
Now we've air fried the most difficult component of any burger, the beef patty which needs additional time to properly come up to temperature in the centre, we can begin to add any addition items you wish to re-introduce to your burger in a bun.
- STEP 1: Wipe off any grease to re-build burger - As grease inside the burger tends to sit on top of a grilled burger, ensure to wipe off this sitting grease so we can proceed to add a fresh but optional cheese slice to melt on top - WARNING: at this stage check the inside of the air fryer to be sure the cheese isn't floating around
- STEP 2: Secure Bacon under patty - Similarly to preventing a light slice of Cheddar cheese floating around inside the basket; bacon can be lightweight also, thus I am going to pinch both bacon rashers slightly under the heavier beef patty
- STEP 3: Add Onion Rings to air fryer - With my burger I like to add a battered onion ring or two to my burgers, thus I need to reheat them along with the time its takes to properly reheat the bacon for 2 minutes, although it can take less time
- STEP 4: Warm Burger Bun for final minute, inside bun facing up - Now finally with a minute to go - its all hands-on deck for the final minute - as I am going to warm up my burger bun to ensure any dampness dries up, and to get any chill out of the middle. In the final image above, you'll see I've moved the bacon to make space for the two slices of burger buns - which would otherwise be sitting on bacon grease
Reheat fried onions on top of the cheese, if indeed you need to reheat fried onions, with a minute to go. You can reheat fried onion as most people will have them ready to be added back into the burger - in my case I am not using fried onions this time around.
STAGE 4: Re-assemble Burger bun
With the burger air fried for a total of 6 minutes and the additional ingredients giving two minutes each, all components should now be sitting in your air fryer basket or on top of the crisper, along with new or old cheese melted on top of the patty.
Re-assemble your burger by utilizing silicone-tipped tongs to easily, and safely, assemble your burger back to the way it was originally layered on the grill, oven or BBQ.
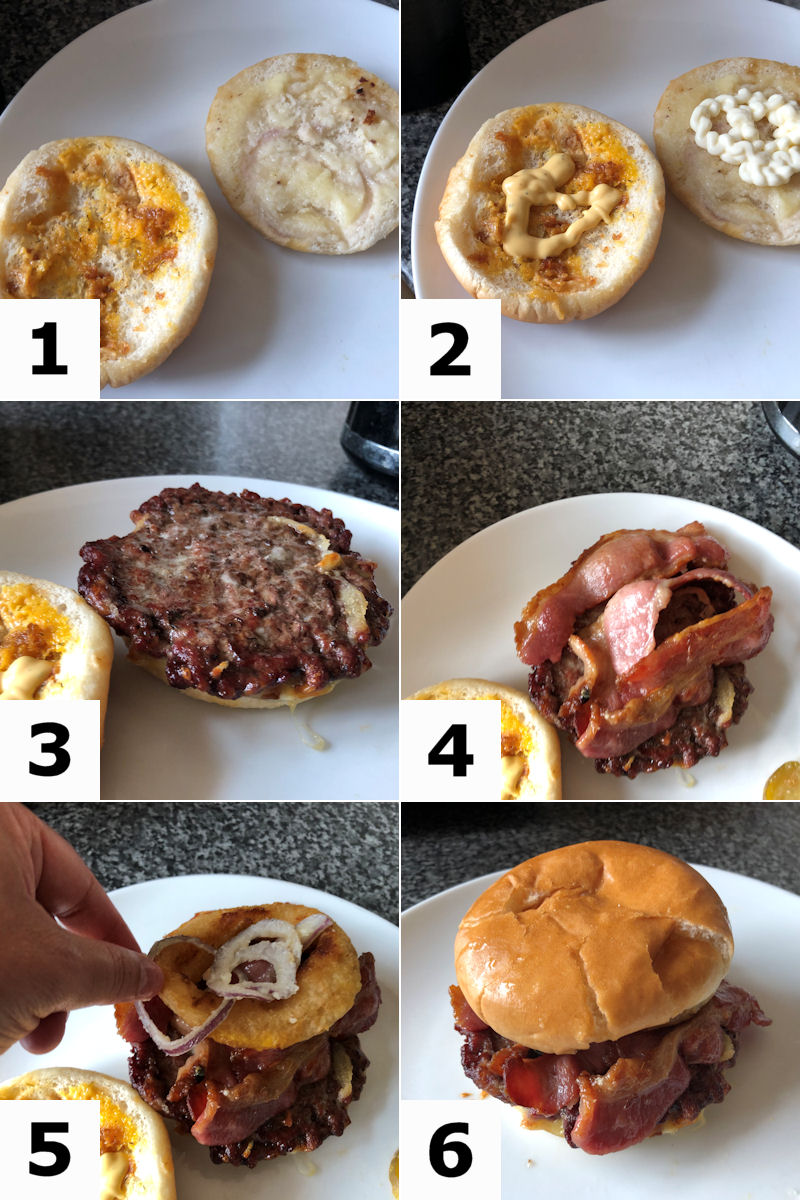
- STEP 1: Place bottom Burger Bun on plate - With potentially a warmed up plate sitting near to the air fryer, add the reheated bottom burger bun onto the plate - along with the top slice next to it - with the flat inside bun facing up
- STEP 2: Re-apply favourite sauces to top/bottom bun - We've scraped the sauce off the bun which was originally applied, and thus its time to re-apply your favourite sauce, in which I am adding mayonnaise to the bottom slice, burger sauce to the top
- STEP 3: Carefully scoop out Patty onto bun - With use of tongs or a spatula - which is a little more awkward - carefully grab the burger patty and centre it on the bottom burger slice, which is directly on top of my dollop of mayo
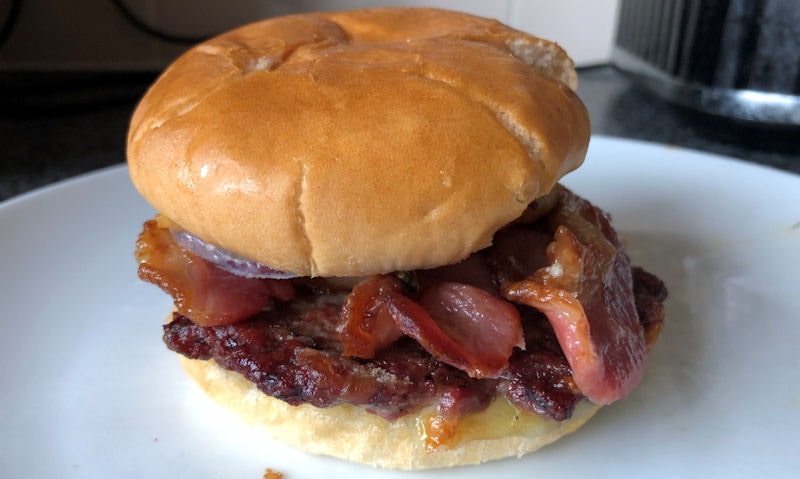
- STEP 4:Pop crispy bacon on top of melted cheese - Melted cheese will be on top of the burger of course (and of course I stupidly laid the cheese-side upside down), where I have positioned three bacon rashers side-by-side - to utilize the extra wide smashed burger patty - to ensure I get a proper bite of bacon. On top of the bacon, I will centre my single onion ring I almost forgot about
- STEP 5: Add cold ingredients - With the layer thus far consisting of a warmed bottom burger bun; burger patty; cheese and bacon on top; Re-apply gherkins plus a fresh salad traditionally made up of raw thin-sliced onions, lettuce, and tomato
- STEP 6: Close Burger and eat - You've now successfully reheating your burger with a bun in the air fryer, of which now sauces have been re-applied and the additional ingredients are locked in, so its finally time to close the burger and enjoy - be sure to get hamburger recipe ideas before rushing into reheating your burger
I planned to eat by burger by its self, of which I would of liked to air fried a small portion of fries if I had time. To air fry burger with fries I would air fry the fries prior to reheating my burger and bun - then proceeded to follow the air fry instructions outlined above - before reheating the fries in a foil pouch for the final 4-5 minutes of reheating the burger.
What I've learnt
Reheating a simple burger in a bun wasn't all that difficult, and there's certainly an opportunity to make mistakes that you can quickly ratify by heating the burger especially for 1-2 minutes longer, if indeed it hasn't reheated enough.
And while all assembled burger components don't look all that appetizing when spread out on my plate, the taste was quite similar to the burger I originally had at a family barbecue, just 24 hours prior.
Temperate of 200°C/400°F was perfectly suited to get my burger fully reheated this time around, and was enough to provide some crisp to the onion rings and bacon.
One minute to reheat the burger bun was more than enough, which wasn't too long to make the bun crispy, but just enough to warmed it through as intended.
I suggested anchoring the bacon slices under the burger patty to weigh them down to prevent them being thrown about within the air fryer; in reality the pre-cooked bacon was weighed down enough to stay in place.
Original slice of cheese melted significantly underneath the burger patter, which I now regret not spooning it back on top of my burger, which I might add the remaining melted cheese was plentiful. On the plus side, I learnt how to melt cheese in an air fryer with the parchment paper providing the ideal base to melt the Cheddar cheese on.